Images en fr
Images can be shared thank of Rolisteam. It is useful to show things to players such as characters, places, venues, landmarks and so on.
Images can not be modified. It is impossible to paint over Images. Map or Vectorial map is the right answer for that.
Identify Image from other kind of window
All image subwindows have the same icon:

All image subwindows title is ended by the text: (image).
Supported formats
Rolisteam accepts many standard formats such as: *.jpg,*.png and *.bmp.
It may supports many other formats depending of the platform. The whole list is available in the diagnostic tab in the preferences panel.
Open image
Rolisteam can not create new images. They must be opened (File > Open Image).
Then, the opened image is sent to all users.
Save Image
A image can only be saved as part of a scenario (File menu then Save scenario).
Contextual Menu
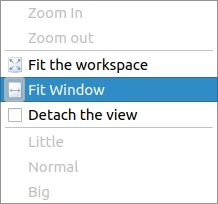
By default, fit window is enabled. In this configuration, Rolisteam ensure the whole image is visible.
It is really useful for huge image.
If you want to zoom in a particular part of the picture, you must disable it.
Zoom in/out
Sometime it’s useful to manage zoom level manually. To get access to zoom level feature, just show the contextual menu and click on Fit window to unselect this mode.
You can activate all these feature throught the contextual menu:
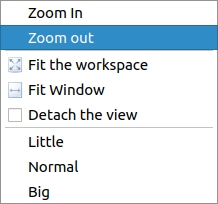
- zoom up, zoom down (the minimun value is 0.2)
- Fit the image window in the workspace
- Fit the image to its window (keeping the ratio) (Default)
- Level of Zoom: Little, normal, Big
Load Image From Internet
You may load images from the Internet.
The dedicated dialog box is reachable at file > Open > Online Image.
The following dialog appears:
Step 1

When the Url is set, Rolisteam downloads automatically the image and displays it in the preview panel. It may be required to click on download to make Rolisteam get the image faster.
Step 2
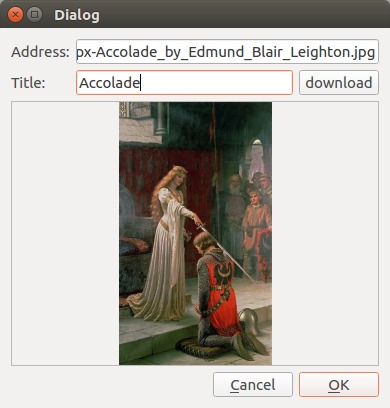
In this state, it is possible to change the image’s title. When it is done. You can click on Ok
Then, the image will appears as a regular image.
Step 3
Hide Image
There are two ways to hide the image. You may click on the cross on the subwindows or you may click on image’s name in the subwindows menu.
The image is hidden. To show it again, just click on its name again in the subwindows menu.
Either ways, the image is hidden only for you. All other players may still see the image.
Close Image
The GM or the owner of the image may close it.
This means the image will disappear from every player’s workspace.
To do so, Inside the file menu, click on Close Map/image