Map en fr
New map
Click on File > New > Map or use the shortcut Ctrl+m
The map wizard is displayed.
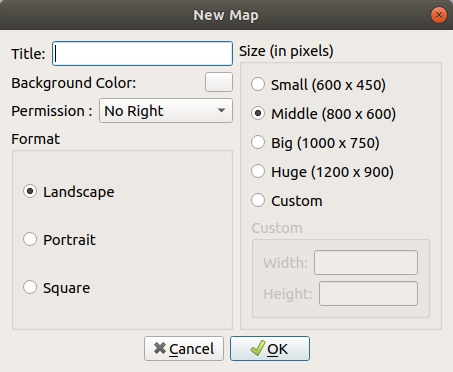
Select the appropriate color, permission, shape, size.
Add name to the map. then click on Ok.
The map appears.
Be careful, permission cannot be changed after.
Open map
Click on File > Open > Map or use the shortcut Ctrl+
Map wizzard appears.
Set name
Select a .map file.
Select visibility.
Select permission mode.
Then click on Ok.
The map appears.
Open map from image
Click on File > Open > Map or use the shortcut Ctrl+
Map wizzard appears.
Set name
Select a image file as background of your map.
Select visibility.
Select permission mode.
Then click on Ok.
The map appears.
Permission
There are 3 different modes: * GM_ONLY : Only the GM can paint on the map and move tokens (default mode). * Character: The GM can do anything and players may move token of their own character. * All: Anyone can do everything
Paint map
This toolbar is gathering all map tools. There are two different parts. The higher part is dedicated to painting tools. The lower part brings together tools for PC/NPC management.
Let’s talk about Painting tools

Current Color
It shows the current color. All painting tools will use this color. A color selector dialog is open each time you click on the color. You can select the current color or your custom color.
You may chose color from the map, by right-clicking with right-button. The mouse cursor change into pipette.
Preselected colors
It is a color set which you can select.
Custom Colors
It is colors defined by the user. On windows, you can select it thanks to the color selector. It opens up when you double-click on the current color zone. On Mac Os, you must double-click on them.
Special Colors
 or
or 
There are three special colors. Each of them have a specific meaning. From left to right, the erase color, the masking color and the unmasking color. You may use any tool you want to erase, masking or unmasking.
Pencil

It allows hand painting
Line

Draw line between the first click and the second click
Empty Rectangle

Draw a rect between the first click and the second
Filled Rectangle

Same as empty Rectangle, but the rectangle is filled.
Empty Ellipse

It draws an empty ellipse which is centered on the first left-click position.
Filled Ellipse

same as empty ellipse, but it is filled
Text

Select the text tool. You need to set text in the text field. Then, by clicking on the map the text is drawn where you click. You can move the cursor to put it in the most accurate place. Then, When you release the mouse button, the text is written into the map.
Hand

The hand tool allows you to move the map when it is bigger than its windows. You have to click end move the mouse to start moving. When you are at the right place or at the end of your motion you can release the mouse button. It is also working on Image (if you have scrollbar on images).
Line width
This tool is dedicated to paint straight line from the first click to the second. You may select the width of the line thanks to the size selector.
Move PC/NPC

Thanks to this tool, you may move NPC or PC tokens on maps. To do so, left-click on the token, keep the mouse button pressed and move to the wanted place before release the mouse button. At this moment, the same motion happens to all users. By right-clicking on the token, the orientation sign appears or disappears. When it appears you can move te mouse to the right place.
Change state PC/NPC
With left-clicks,this tool triggers the current state of Npc token to change to the next state. Its color changes, and a tooltip describes its state.
- Healthy
- Injured
- wounded
- Dead
- sleepy
- bewitched
The right-click allows you to set the orientation of the character. To do so, right-click and move the mouse to the point you want.
Add NPC

Select the tool, click on map, character token is added to the map. The token color is the current selected one. The name of the NPC is the composition between the current text and current number. You may change the size of the token. The number is automatically incremented.
Please remember that it is impossible to add NPC while specific color are selected.
Remove NPC

It allows to delete NPC token on map. Select the tool and then click on NPC token. The token disappears. This tool has no effect on PC token.
reset NPC counter

You can reset the NPC number to be 0.
NPC number
It is the number of the next NPC. The number goes to 99 and then start again from 0
NPC name
Text field where you may specify the NPC name.
NPC size
Select the size of NPC token on the current map.
Fog of war
Fog of war is managed as specific color. Paint with this color make appear the fog of war.
character tokens
Token represents the position of character. It coul
Technical details
In any part of role playing game, there comes a time when the GM take a piece of paper to draw a map, scribble a quick diagram of a mechanism, or pull out from behind his screen a beautiful photocopied map which he tries to hide 80% with his hands. Maps in Rolisteam are there to fulfill this function. You will be able to draw your maps show of hands, or import them from your picture library, or even prepare your maps in advance, by annotating and hiding areas out of sight of PC. You will be able to make maps from picture files (JPEG, PNG, BMP), on which you can draw and add characters.
In general terms the map can be considered as the superposition of three layers:
- the background layer is either an picture or a solid color (if you create an empty map);
- you can draw on the medium layer (and erase your annotations using the color erase) without affecting the bottom layer;
- the upper layer will hide the other two (using the color masking / unmasking).
The map windows are recognizable by their workspace icon. Only the GM can open maps. There are three ways for this to proceed:
- You can create an emtpy map of solid color, by clicking New map void in the File menu. You can then specify the name of the map, its size and background color. Then the new map will open for all players.
- you can create a map from an picture file (JPEG, PNG or BMP) by clicking Open from the File menu, and selecting an picture. The picture is then transferred to the players and a new map is created, at the dimensions of the picture. If you prefer that the map appears hidden to players, simply open the map using Open map and hide from the File menu and selecting the picture file.
- You can also open a previously saved map with Rolisteam , by clicking Open on the File menu map and selecting a map file (. PLA). The map is then transmitted as it is to other players. Note that when saving map, the PCs are replaced with NPCs (who wear the number 0), you will have to put the characters of the players instead of NPCs. There you have the possibility to hide the entire map, regardless of masking information already on it, by opening it with Open Plan and hide.
Once the map is open, you can draw on it using the drawing tools in the toolbar. You can also add NPC again thanks to the toolbar and bring up the PCs by checking the appropriate boxes in the list of users. The GM also has the ability to hide certain parts of the map using the special color mask that can be used with any drawing tool. The area covered becomes opaque for the players, while remaining transparent to the GM. The map is unmasked with the unmasking special color.
You can save a map in its actual state by clicking Save from the File menu. In the saved file the PCs are transformed into NPC: they keep the same name, the same color and wear the number 0. This transformation opens the map even if there is actually not all the players that were at the backup. A map can also be saved as part of a scenario (scenario Save from the File menu). When the GM backups a scenario, Rolisteam creates a. SCE containing all maps and pictures currently open and the notes of the user. At the opening of a scenario maps and pictures contained in it are sent to all connected players, and the notes of the GM are updated.
As with other windows in the workspace, the maps may be closed, which has the only consequence to hide its window. To show the map again you only have to click on its title from the Window menu. If you want to remove the map for the current game, ie it is permanently closed to all players, you must click Close map/picture from the File menu. The map disappears for all users. Only the GM can close down a map.